Configuring Your MX Records with GoDaddy.com for Google Mail
A mail exchange (MX) record identifies a server that handles email messages
for your domain. A domain has one or more MX records listed in priorty order.
When someone sends an email message to your domain, the sender’s mail server
delivers it to the first available server in the priority list. You create new
MX records, or change their priority, in order to change how email is processed
for the domain. (Learn more about MX records
and mail server priority.)
You create MX records using the administration tools available from your
domain provider.
| If you purchased your domain from GoDaddy while signing up for Google Apps, do not use these instructions. Google will automatically configure the MX records for your domain when you activate email in the Google Apps Control Panel. |
There are two ways to create MX records for the Google Apps mail servers when
GoDaddy hosts your domain:
- Use GoDaddy’s configuration tool to automatically create the necessary
Google Apps MX records. Log into the configuration tool at https://www.godaddy.com/gdshop/google/gmail_login.asp. - Manually create the Google Apps MX records by following the steps
below.
To manually create MX records for a domain hosted by GoDaddy:
- Log in to your account at http://www.godaddy.com by clicking the My
Account tab. - Under the Domains header, find the domain you’re using with
Google Apps. Click (Advanced Details) to the right of this
domain. - Under the DNS Manager header, click
Launch. - In the MX (Mail Exchanger) section, click Quick
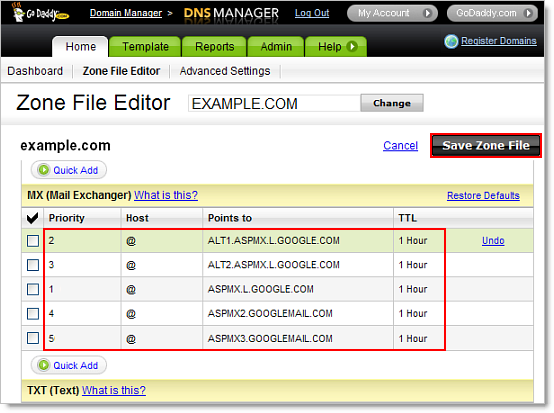
Add. - Add an MX record for each mail server in the table below.
Priority Mail
Server1 ASPMX.L.GOOGLE.COM. 5 ALT1.ASPMX.L.GOOGLE.COM. 5 ALT2.ASPMX.L.GOOGLE.COM. 10 ASPMX2.GOOGLEMAIL.COM. 10 ASPMX3.GOOGLEMAIL.COM. For each MX record, make sure to:
- Enter the corresponding priority in the Priority field.
- Enter an @ sign in the Host field.
- Enter the fully qualified server name of the email server—such as
ASPMX.L.GOOGLE.COM.—in the Points to field. Include a period at
the end of the server name. - Select 1 Hour from the TTL drop-down list.
- Delete any existing MX records, or lower their priority. For now, we
recommend that you keep all existing MX records, but lower their priority.
Later, once you have tested your service and confirmed mail flow, you can delete
these records to ensure that mail flows through the new mail server(s). - Once you’ve added all 5 MX records in the table, click Save Zone
File at the top or the bottom of the page.
Congratulations! Your new MX records now point to Google. Keep in mind that
changes to your DNS settings can take up to 24 hours to propagate through the
Internet, but depending on your host, this can happen faster.
If you have difficulty creating MX records, contact GoDaddy for
assistance.